
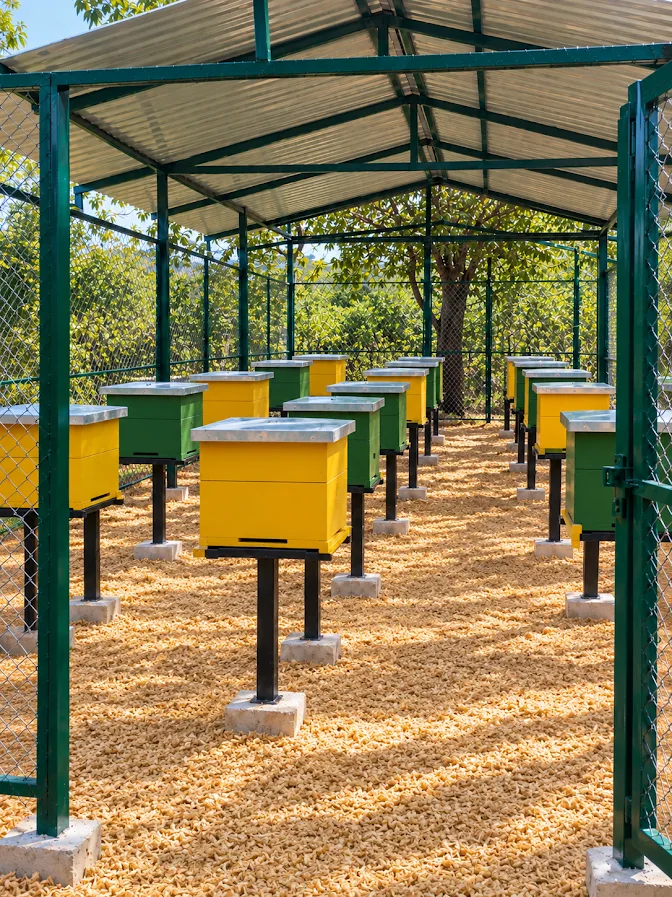

You do not need a perfect apiary to start beekeeping. You need hives, bees and a plan. This guide shows you how to build an apiary with materials you can find locally, when metal stands are the better choice, and how to use both together so your project can start now and grow later.
What Is an Apiary?
An apiary is a dedicated place where beehives are kept together. Usually it is fenced or screened, shaded from the harshest sun and sheltered from strong wind. Think of it as the home base of your beekeeping business: the one place where hives, tools and routines all come together.
Why an Apiary Is Worth Having
Hives can survive almost anywhere, but a proper apiary gives you real advantages:
Protection from predators and pests. A fence, raised stands and a cleared floor keep out honey badgers, ants, rodents and wandering livestock.
Security. A fenced, lockable site discourages theft and vandalism.
Shelter from the weather. A roof keeps the hives dry in the long rains and cool in the dry spells. Heat and damp both weaken colonies.
Easier management. With all hives in one place, inspections, feeding, watering and harvesting take less time and fewer trips.
A cleaner, tidier operation. A neat apiary is easier to keep clean, which helps with hive hygiene and with the quality of what you harvest.
Room to grow. If you plan to scale up, for example to 50 or 100 hives for bee venom production, a central site makes it far easier to manage.
A place to train and show visitors. Buyers, trainees and partners can see a well-run operation.
Where Metal Stands Shine
Metal stands are not a poor man's version of an apiary. They have their own strong advantages, and many beekeepers use them on purpose.
They help you capture colonies. You can place stands anywhere on the farm, near flowering trees, along fence lines and close to water. This spreads your chances of attracting swarms.
They work where trees are scarce. Many farms have few trees to hang hives from, and a stand gives you a safe, raised place for a hive anyway.
They lift hives off the ground, which keeps out many ants and helps protect against honey badgers.
They are durable and movable. Metal does not rot, and you can shift a stand when you need to.
They are quick. You can start with a few stands in a day.
Apiary vs Metal Stands at a Glance
Apiary | Metal stands | |
|---|---|---|
Best for | Managing many hives in one place | Capturing colonies across the farm |
Security | High, if fenced and lockable | Lower, because hives are spread out |
Weather protection | Good, with a roof or shade | Depends on the site |
Starting cost | Medium, but can be done cheaply | Lower per hive |
Work required | Less walking, easier routine | More walking between hives |
Flexibility | Fixed location | Easy to move |
The real answer is that it depends on your goals, your land and your budget. Many beekeepers use both.
The Smart Way to Start: Stands First, Apiary Second
You do not have to wait for a finished apiary before you start. A simple plan works well:
Place hives on stands around the farm to attract swarms. Choose sunny, quiet spots with water and flowering plants nearby.
Build your apiary while the hives are being colonised. Colonisation takes time, and that waiting period is the perfect window to build.
Move the colonised hives into the apiary once they are established.
Keep some stands in the field as swarm traps for the next season.
In this way, building the apiary is never a reason to delay your start.
How to Build an Apiary with Local Materials
You do not need concrete or imported materials. A simple apiary can be built from things most farms already have.
What you can use:
Local timber poles for posts, frames and stands
Old iron sheets for a roof or windbreak
Wire, wooden slats or old sheets for the fence
Stones or bricks to prop up stand legs and keep them dry
Step by step:
Choose the site. Look for a quiet spot away from paths, livestock yards and noisy areas, with shade for part of the day, a water source nearby and flowering plants close by. Hive entrances that face the morning sun are a good choice.
Clear the ground. Remove tall grass and weeds so ants and other pests have nowhere to hide.
Set the posts. Dig in your timber poles and fix a simple frame.
Add a roof. An old iron sheet roof over the hives protects them from rain and harsh sun. Slope it so water drains away from the hives.
Fence it. Use wire, slats or old sheets to keep out animals and discourage thieves. Add a gate you can lock.
Raise the hives. Put each hive on a stand at least a metre high, and add oil or grease on the legs to stop ants.
Leave space to work. Give each hive enough room around it so you can inspect and harvest comfortably.
Keep a water point nearby so the bees do not have to travel far.
That is all you need to begin. A basic apiary like this is a perfectly good place to keep bees.
How to Move Hives into the Apiary
Once your hives are colonised and the bees are settled, moving them needs a bit of care.
Wait until the colony is established, with comb built and the bees working steadily.
Move at night or very early, when the bees are inside.
Secure the hive so the combs do not shift or break during the move.
Close the entrance with fresh grass or leaves for a short time, so the bees notice the change and re-orient when they come out.
Watch the old spot. Foragers may return to where the hive used to be. If you see confused bees, leave a small box or branch there for a few days so they can regroup.
Wear protective clothing and have your smoker ready.
Plan for a Better Apiary Later
Start simple, but keep your future in mind. As your hives and income grow, you can upgrade to an apiary that is:
Larger, with room for many hives, such as 50, 100 or more
Neat and clean, with a tidy layout and firm, level ground
Better protected, with a stronger fence, a permanent roof and secure storage
Better equipped, with water supply, a tool store and a clean area for harvesting and processing
A good habit is to sketch your future apiary now, even if you only build a small corner of it. That way, each addition fits into the plan instead of being rebuilt later.
Frequently Asked Questions
Do I need an apiary to start beekeeping?
No. You can start with a few hives on stands and build the apiary while the hives are being colonised.
Can I keep bees using only metal stands?
Yes. Stands work well, especially where trees are limited. An apiary just adds security, shelter and easier management.
What is the cheapest way to build an apiary?
Use materials you already have, such as local timber poles, old iron sheets, wire and stones, and keep the design simple.
How high should hive stands be?
At least about a metre above the ground, with oil or grease on the legs to keep out ants.
When should I move hives into the apiary?
After the colony is established and the bees are settled. Move at night, and re-orient the bees as described above.
How many hives can an apiary hold?
As many as your space and management allow. Start small and add hives gradually.
Work with Us at Horizon Bee Africa
If you are starting out, we can help. We train beginners, supply hives and equipment, provide a market for your produce, and support beekeepers who want to scale up, including those planning bee venom farms. If you want advice on setting up your apiary or choosing between stands and a fenced site, get in touch: https://horizonbeeafrica.com/contact
Final Word
An apiary and a set of metal stands are not rivals. Stands help you catch colonies anywhere on your farm. An apiary gives you security, shelter and a tidy base to work from. Start with what you can afford, build as your bees settle, and keep improving. The most important step is to begin.
Comments
0 comments